[Best] Nút trở về đầu trang back to top

Đây là code javascript mình sử dụng cho nhiều trang với chứng năng good nhất có thể
– Tùy chỉnh vị trí hiển thị
– Tùy chỉnh text, ảnh, html,… hiển thị
– Chỉ hiển thị khi nội dung trang dài
– Code đơn giản nhẹ, dễ sử dụng

Nút back to top trở về đầu trang

Để chèn nút back to top này bạn chỉ cần download file dưới đây về
backtotop.rar
Trong đó đã có hướng dẫn cụ thể
Bạn chỉ cần up các file jquery-1.7.1.min.js, scrolltopcontrol.js, backtotop.png lên hostting sau đó chèn đoạn mã vào trước thẻ
[html]
<script type="text/javascript" src="jquery-1.7.1.min.js"></script>
<script type="text/javascript" src="scrolltopcontrol.js"></script>
[/html]
Chúc các bạn thành công

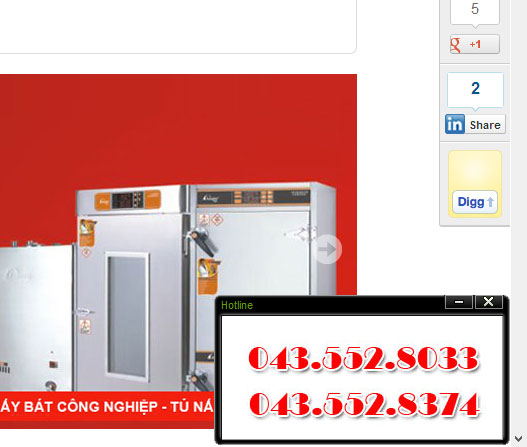
Code quảng cáo góc phải trang web flash popup windows ads

bottom right conner flash popup ads windows

Có thể tùy chỉnh quảng cáo là flash, video, text, hình ảnh, html…
Tùy chỉnh độ rộng, thời gian hiển thị, có nút thu nhỏ, tắt rất tiện lợi và không gây khó chịu cho khách truy cập
Chỉ cần copy code sau dán trước thẻ body trong code của bạn
[js]<br />
<script type="text/javascript">
//Alert MsgAd
clicksor_enable_MsgAlert = true;
//default pop-under house ad url
clicksor_enable_pop = true; clicksor_frequencyCap = 0.1;
durl = ”;
//default banner house ad url
clicksor_default_url = ”;
clicksor_banner_border = ‘#000f30’; clicksor_banner_ad_bg = ‘#FFFFFF’;
clicksor_banner_link_color = ‘#0c15ff’; clicksor_banner_text_color = ‘#da0041’;
clicksor_banner_image_banner = true; clicksor_banner_text_banner = true;
clicksor_layer_border_color = ”;
clicksor_layer_ad_bg = ”; clicksor_layer_ad_link_color = ”;
clicksor_layer_ad_text_color = ”; clicksor_text_link_bg = ”;
clicksor_text_link_color = ‘#0c59ff’; clicksor_enable_text_link = true;
clicksor_enable_VideoAd = true;
</script></p>
<style type="text/css">
* html div#fl813691 {position: absolute; overflow:hidden;<br />
top:expression(eval(document.compatMode &&<br />
document.compatMode==’CSS1Compat’) ?<br />
documentElement.scrollTop<br />
+(documentElement.clientHeight-this.clientHeight)<br />
: document.body.scrollTop<br />
+(document.body.clientHeight-this.clientHeight));}<br />
#fl813691{font: 12px Arial, Helvetica, sans-serif; color:#666; position:fixed; _position: absolute; right:0; bottom:0; height:150px; }<br />
#eb951855{ width:289px; padding-right:7px; background:url(https://lh5.googleusercontent.com/-tC1Af6p9aw8/UEuOWQws00I/AAAAAAAAa-g/BbHcKKr5plc/s0/fullborder_bg_right.gif) no-repeat right top;}<br />
#cob263512{background:url(https://lh4.googleusercontent.com/-ClNrLnNnkOc/UEuOWLuYZ1I/AAAAAAAAa-k/FTBzIb2RH7E/s0/fullborder_bg.gif) no-repeat left top; height:150px; padding-left:7px;}<br />
#coh963846{color:#690;display:block; height:20px; line-height:20px; font-size:11px; width:283px;}<br />
#coh963846 a{color:#690;text-decoration:none;}<br />
#coc67178{float:right; padding:0; margin:0; list-style:none; overflow:hidden; height:15px;}<br />
#coc67178 li{display:inline;}<br />
#coc67178 li a{background-image:url(https://lh6.googleusercontent.com/-GndSGSlTOiY/UEuOWHOL_3I/AAAAAAAAa-c/duzdTEwLvK0/s0/button.gif); background-repeat:no-repeat; width:30px; height:0; padding-top:15px; overflow:hidden; float:left;}<br />
#coc67178 li a.close{background-position: 0 0;}<br />
#coc67178 li a.close:hover{background-position: 0 -15px;}<br />
#coc67178 li a.min{background-position: -30px 0;}<br />
#coc67178 li a.min:hover{background-position: -30px -15px;}<br />
#coc67178 li a.max{background-position: -60px 0;}<br />
#coc67178 li a.max:hover{background-position: -60px -15px;}<br />
#co453569{display:block; margin:0; padding:0; height:123px; border-style:solid; border-width:1px; border-color:#111 #999 #999 #111; line-height:1.6em; overflow:hidden;}<br />
</style>
<div style="height: 152px; z-index:9999;" id="fl813691">
<div id="eb951855">
<div id="cob263512">
<div id="coh963846">
<ul id="coc67178">
<li id="pf204652hide"><a class="min" href="javascript:pf204652clickhide();" title="Ẩn cửa sổ này">Ẩn cửa sổ này</a></li>
<li id="pf204652show" style="display: none;"><a class="max" href="javascript:pf204652clickshow();" title="Mở cửa sổ này">Mở cửa sổ này</a></li>
<li id="pf204652close"><a class="close" href="javascript:pf204652clickclose();" title="Tắt cửa sổ này">Tắt cửa sổ này</a></li>
</ul>
<p> Hotline
</div>
<p> <!–280×133–></p>
<div id="co453569">
<img src="image/data/common/docongnghiep_bottom_banner.jpg" alt="hotline" />
</div>
</div>
</div>
</div>
<p><script>
pf204652bottomLayer = document.getElementById(‘fl813691′);
var pf204652IntervalId = 0;
var pf204652maxHeight = 150;
var pf204652minHeight = 20;
var pf204652curHeight = 0;
function pf204652show( ){
pf204652curHeight += 2;
if (pf204652curHeight > pf204652maxHeight){
clearInterval ( pf204652IntervalId );
}
pf204652bottomLayer.style.height = pf204652curHeight+’px’;
}
function pf204652hide( ){
pf204652curHeight -= 3;
if (pf204652curHeight < pf204652minHeight){
clearInterval ( pf204652IntervalId );
}
pf204652bottomLayer.style.height = pf204652curHeight+’px’;
}
pf204652IntervalId = setInterval ( ‘pf204652show()’, 5 );
function pf204652clickhide(){
document.getElementById(‘pf204652hide’).style.display=’none’;
document.getElementById(‘pf204652show’).style.display=’inline’;
pf204652IntervalId = setInterval ( ‘pf204652hide()’, 5 );
}
function pf204652clickshow(){
document.getElementById(‘pf204652hide’).style.display=’inline’;
document.getElementById(‘pf204652show’).style.display=’none’;
pf204652IntervalId = setInterval ( ‘pf204652show()’, 5 );
}
function pf204652clickclose(){
document.body.style.marginBottom = ‘0px’;
pf204652bottomLayer.style.display = ‘none’;
}
</script><br />
[/js]

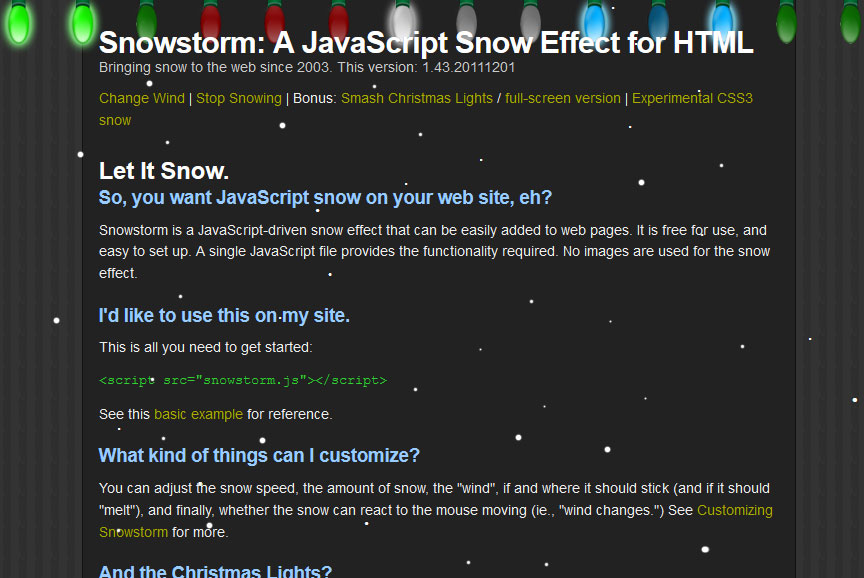
Snowstom: tạo tuyết rơi trên trang web dễ dàng mà đẹp

Hãy để tuyết rơi!!!

Snowstom là một hiệu ứng viết bằng javascript có thể dễ dàng thêm vào các trang web. Nó hoàn toàn miễn phí và rất dễ dàng thiết lập. Snowstom chỉ gói gọn trong 1 tệp tin js không sử dụng hình ảnh cho các hiệu ứng tuyết điều này giảm đáng kể dung lượng cho trang web.

Snowstom Demo
Snowstom Demo

Để sử dụng tất cả điều bạn cần làm là download file snowstorm về tại đây:

github.com/scottschiller/snowstorm/

hoặc tại trang web của tác giả: http://www.schillmania.com/projects/snowstorm/

Sau đó bạn upload file snowstorm.js lên hosting và chèn dòng mã sau vào trang web của bạn:

<script src="snowstorm.js"></script>

Bạn có thể tùy chỉnh tốc độ tuyết rơi nhanh hay chậm, số lượng bông tuyết rơi cùng lúc, tốc độ gió, hướng gió di chuyển theo chuột

Snowstom tương thích hầu hết các trình duyệt cũ (IE 5.x +, Netscape 6 +) cũng như các trình duyệt mới IE 6, 7, 8, Firefox, Safari, Opera.

Snowstom tương thích với các trình duyệt trên các thiết bị di động iPhone, iPad và Android. Tuy nhiên Snowstom sẽ ngốn nhiều CPU khi chạy vì vậy với các thiết bị di động các bạn có thể thiết lập snowStorm.excludeMobile = false để người dùng thiết bị di động khi vào trang web của bạn sẽ không bị treo máy, hao pin.

Tùy biến Snowstorm

Bạn có thể tùy chỉnh các hiệu ứng trong tệp snowstom.js hoặc bằng mã javascript trong trang web của bạn.

Ví dụ:

[html]
<!– required snowstorm JS, default behaviour –>
<script src="snowstorm.js"></script>

<!– now, we’ll customize the snowStorm object –>
<script>
snowStorm.snowColor = ‘#99ccff’; // blue-ish snow!?
snowStorm.flakesMaxActive = 96; // show more snow on screen at once
snowStorm.useTwinkleEffect = true; // let the snow flicker in and out of view
</script>
[/html]

Tham khảo một số thuộc tính và phương thức của snowstom bên dưới nhé:

Configurable Properties

Snowstorm can be fairly easily customized; some of the major properties are listed below.

snowStorm.autoStart = true;
Whether the snow should start automatically or not.
snowStorm.animationInterval = 33;
Theoretical “miliseconds per frame” measurement. 20 = fast + smooth, but high CPU use. 50 = more conservative, but slower
snowStorm.flakeBottom = null;
Limits the “floor” (pixels) of the snow. If unspecified, snow will “stick” to the bottom of the browser window and persists through browser resize/scrolling.
snowStorm.flakesMax = 128;
Sets the maximum number of snowflakes that can exist on the screen at any given time.
snowStorm.flakesMaxActive = 64;
Sets the limit of “falling” snowflakes (ie. moving on the screen, thus considered to be active.)
snowStorm.followMouse = true;
Allows snow to move dynamically with the “wind”, relative to the mouse’s X (left/right) coordinates.
snowStorm.freezeOnBlur = true;
Stops the snow effect when the browser window goes out of focus, eg., user is in another tab. Saves CPU, nicer to user.
snowStorm.snowColor = '#fff';
Don’t eat (or use?) yellow snow.
snowStorm.snowCharacter = '•';
&bull; (•) = bullet. &middot; entity (·) is not used as it’s square on some systems etc. Changing this may result in cropping of the character and may require flakeWidth/flakeHeight changes, so be careful.
snowStorm.snowStick = true;
Allows the snow to “stick” to the bottom of the window. When off, snow will never sit at the bottom.
snowStorm.targetElement = null;
Element which snow will be appended to (default: document body) – can be an element ID string eg. ‘myDiv’, or a DOM node reference.
snowStorm.useMeltEffect = true;
When recycling fallen snow (or rarely, when falling), have it “melt” and fade out if browser supports it
snowStorm.useTwinkleEffect = true;
Allow snow to randomly “flicker” in and out of view while falling
snowStorm.usePositionFixed = false;
true = snow not affected by window scroll. may increase CPU load, disabled by default – if enabled, used only where supported.
snowStorm.vMaxX = 8;
snowStorm.vMaxY = 5;
Defines maximum X and Y velocities for the storm; a random value in this range is selected for each snowflake.

Methods

Snowstorm has a few basic methods for controlling the snow effect.

snowStorm.randomizeWind()
Sets the wind speed with a random value relative to vMaxX and vMaxY properties.
snowStorm.freeze()
Stops the snow effect in place.
snowStorm.resume()
Continues snowing from a “frozen” state.
snowStorm.toggleSnow()
Enables or disables the snow effect depending on state, same as calling freeze() or resume().
snowStorm.stop()
Freezes and kills the snowstorm effect, and removes related event handlers. Snowstorm will not work properly if other methods are called after stop().

Rất đơn giản phải không nào. Xem demo của mình tại đây nhé: http://hanamonline.com/?s=snow khi nào thích xem tuyết rơi cứ vào trang của mình xem tự nhiên nha 🙂

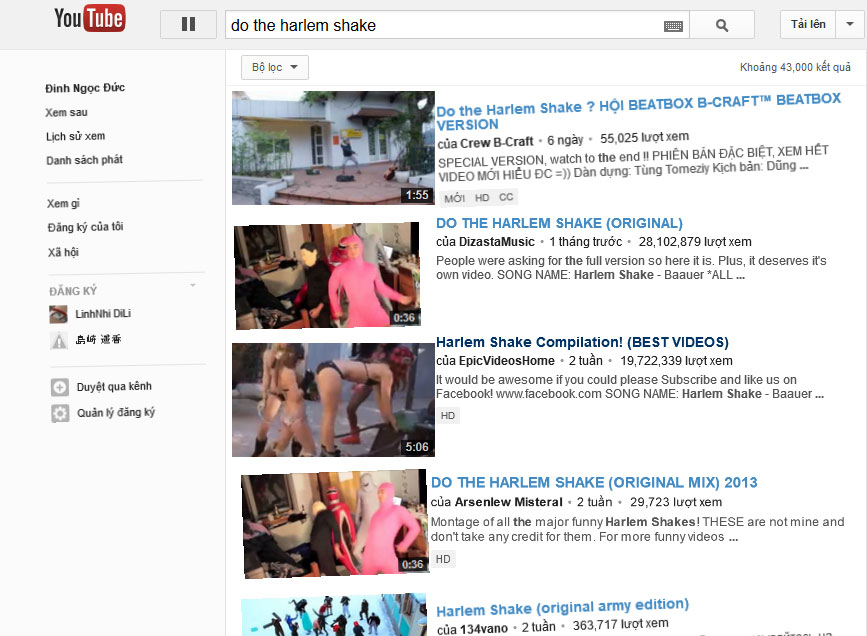
(Javascript) Website “nhảy” Harlem Shake

“Harlem Shake“, điệu nhảy có phần ngớ ngẩn, điên loạn đang gây nên cơn rung chấn cuồng nhiệt trên internet và hứa hẹn sẽ là đối thủ đáng gờm của Gangnam Style trong năm nay. Bắt đầu từ sự ngẫu hứng của chàng trai Filthy Frank và đám bạn khi nghe ca khúc Harlem Shake của Baauer bỗng dưng bật dạy nhảy như điên loại và đã tạo một trào lưu mới trên mạng internet.
Hiện tượng Harlem Shake lan nhanh đến nỗi nó xuất hiện ở khắp mọi nơi với đủ thành phần tham gia. Để góp vui vào trào lưu mới này, trang chia sẻ video hàng đầu thế giới là YouTube cũng “lắc” theo điệu Harlem Shake theo cách riêng của họ. Giờ đây khi bạn tìm kiếm trên YouTube với từ khóa [do the harlem shake] sẽ thấy các kết quả của trang tìm kiếm nhảy điên loạn như thế này với hành động đầu tiên của logo.
http://www.youtube.com/results?search_query=do the harlem shake

Youtube do the harlem shake

Còn bạn thì sao? Hãy cùng hưởng ứng điệu nhảy này nào. Mình sẽ hướng dẫn các bạn 2 cách đơn giản

1. Dùng công cụ sẵn có:

Cách này chỉ đơn giản là vào trang http://hsmaker.com, sau đó nhập url website của bạn vào, thế là xong. Lúc này muốn chia sẻ cho ai đó bạn chỉ cần copy URL trên thanh address rồi gửi cho họ là xong. URL của bạn sẽ có dạng http://hsmaker.com/harlemshake.asp?url=[url_của_bạn]. Nếu muốn chèn vào trang web của bạn bạn có thể dùng iframe hoặc redirect qua là được.

2. Tự tạo hiệu ứng Harlem Shake bằng Javascript:

Đầu tiên, tải về các đoạn mã sẽ dùng trong phần này tại đây. Lưu ý là script này mình cũng sưu tầm thôi hình như là nó ko miễn phí đâu nhé (6$ thì phải)

Upload file harlem.css và harlem.min.js lên hosting của bạn. Lưu ý với file harlem.css cần upload ngang hàng với index.

Chèn đoạn mã sau vào phía trên thẻ </body>:

[html]
<script type="text/javascript" src="harlem.min.js"></script>
<script type="text/javascript">// <![CDATA[
var harlem = null;
$ (function ()
{
harlem = $ .fn.speedoHarlem();
});
// ]]></script>
[/html]

Lưu ý cấu hình đúng đường dẫn đến file harlem.min.js. Sau đó hãy quay lại website để thưởng thức thành quả. Demo của mình http://hanamonline.com/?s=halem+sharke . Chúc thành công.

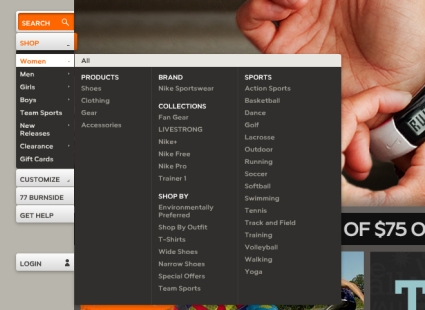
jQuery Mega Menu – tạo menu cho website theo cách chuyên nghiệp

jQuery Mega Menu là 1 jquery plugin được phát triển bởi GeekTantra. Với MegaMenu bạn có thể dễ dàng tạo menu theo phong cách riêng của mình. MegaMenu hỗ trợ menu hiển thị với nhiều hiệu ứng như slideDown/slideUp, fadeIn/fadeOut và các hiệu ứng đơn giản khác. MegaMenu rất nhẹ vì chủ yếu sử dụng CSS và javascript làm nền tảng. Với MegaMenu việc của bạn là sáng tạo menu tạo ra các HTML và việc còn lại là chèn nó cùng với MegaMenu vào website của bạn.
Nếu bạn đã sử dụng MegaMenu thì bạn cũng sẽ dễ dàng hiểu rằng tại sao rất nhiều website lớn trên thế giới sử dụng nó như:

Walmart

Mega menu Walmart
Mega menu Walmart

Adidas

Mega menu Adidas

Nike

Mega Menu Nike

và nhiều website khác như mydeco.com, like.com….

Ở Việt Nam có nhiều website lớn sử dụng MegaMenu như Zing, Mediamart…

Download Jquery Mega Menu tại đây: jquery-megamenu.2.0.zip

Để sử dụng:

Trong phần header của HTML thêm như sau:

[html]
<script type="text/javascript" src="http://ajax.googleapis.com/ajax/libs/jquery/1.4.2/jquery.min.js"></script><script type="text/javascript" src="javascripts/jquery.megamenu.js"></script>
<script type="text/javascript">// <![CDATA[
jQuery(document).ready(function(){
jQuery(".megamenu").megamenu();
});
// ]]></script>
[/html]

Tiếp theo trong body thêm đoạn code sau:

[html]</pre>
<ul class="megamenu">
<li><a href="javascript: void(0)">First Menu</a>
<div style="width: 350px;">Contents of the first mega menu</div></li>
<li><a href="javascript: void(0)">Second Menu</a>
<div style="width: 350px;">Contents of the second mega menu</div></li>
</ul>
<pre>
[/html]

Nếu bạn sử dụng MegaMenu bạn sẽ thấy nó thật tuyệt vời. Để tham khảo thêm các bạn truy cập trang chủ của MegaMenu: http://www.geektantra.com/2009/09/jquery-mega-menu/.Chúc các bạn thành công.

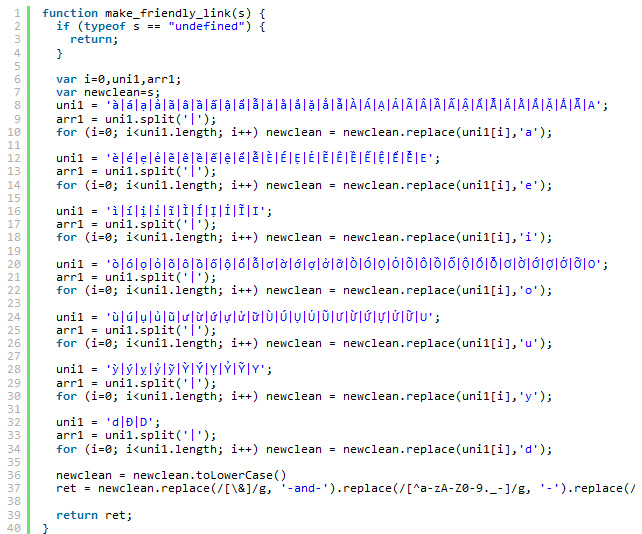
URL tiếng Việt không dấu (friendly link unicode) bằng javascript

Hàm này dùng để tạo URL không dấu tiếng Việt (friendly link unicode) có thể sử dụng cho nhiều mục đích khác nhau. Mình sử dụng trong mã nguồn x-cart vì nó sinh url bằng javascript mà không hỗ trợ unicode tiếng Việt. Ai thấy hữu ích thì thanks mình nha

[code lang=”js”]
function make_friendly_link(s) {
if (typeof s == "undefined") {
return;
}

var i=0,uni1,arr1;
var newclean=s;
uni1 = ‘à|á|ạ|ả|ã|â|ầ|ấ|ậ|ẩ|ẫ|ă|ằ|ắ|ặ|ẳ|ẵ|À|Á|Ạ|Ả|Ã|Â|Ầ|Ấ|Ậ|Ẩ|Ẫ|Ă|Ằ|Ắ|Ặ|Ẳ|Ẵ|A’;
arr1 = uni1.split(‘|’);
for (i=0; i<uni1.length; i++) newclean = newclean.replace(uni1[i],’a’);

uni1 = ‘è|é|ẹ|ẻ|ẽ|ê|ề|ế|ệ|ể|ễ|È|É|Ẹ|Ẻ|Ẽ|Ê|Ề|Ế|Ệ|Ể|Ễ|E’;
arr1 = uni1.split(‘|’);
for (i=0; i<uni1.length; i++) newclean = newclean.replace(uni1[i],’e’);

uni1 = ‘ì|í|ị|ỉ|ĩ|Ì|Í|Ị|Ỉ|Ĩ|I’;
arr1 = uni1.split(‘|’);
for (i=0; i<uni1.length; i++) newclean = newclean.replace(uni1[i],’i’);

uni1 = ‘ò|ó|ọ|ỏ|õ|ô|ồ|ố|ộ|ổ|ỗ|ơ|ờ|ớ|ợ|ở|ỡ|Ò|Ó|Ọ|Ỏ|Õ|Ô|Ồ|Ố|Ộ|Ổ|Ỗ|Ơ|Ờ|Ớ|Ợ|Ở|Ỡ|O’;
arr1 = uni1.split(‘|’);
for (i=0; i<uni1.length; i++) newclean = newclean.replace(uni1[i],’o’);

uni1 = ‘ù|ú|ụ|ủ|ũ|ư|ừ|ứ|ự|ử|ữ|Ù|Ú|Ụ|Ủ|Ũ|Ư|Ừ|Ứ|Ự|Ử|Ữ|U’;
arr1 = uni1.split(‘|’);
for (i=0; i<uni1.length; i++) newclean = newclean.replace(uni1[i],’u’);

uni1 = ‘ỳ|ý|ỵ|ỷ|ỹ|Ỳ|Ý|Ỵ|Ỷ|Ỹ|Y’;
arr1 = uni1.split(‘|’);
for (i=0; i<uni1.length; i++) newclean = newclean.replace(uni1[i],’y’);

uni1 = ‘d|Đ|D’;
arr1 = uni1.split(‘|’);
for (i=0; i<uni1.length; i++) newclean = newclean.replace(uni1[i],’d’);

newclean = newclean.toLowerCase()
ret = newclean.replace(/[\&]/g, ‘-and-‘).replace(/[^a-zA-Z0-9._-]/g, ‘-‘).replace(/[-]+/g, ‘-‘).replace(/-$/, ”);

return ret;
}
[/code]